Welcome!


You can find DIY and inspiring posts.

Comments are welcome as long as they are nice and constructive.

Much love and blessings

Wednesday, July 28, 2010

Summer Flowers from our Balcony

As we all bid farewell to this short summer, I wanted to post some of the flowers we had this year. We had planted seeds in early April and this was the outcome in June-July. I know it's almost a month late but it's a nice way to say bye bye to the season and welcome to windy-cold Fall.

These malvas look like hibiscus but are not related by family. Their common name is Mallow and they are very popular in Mediterranean countries. The plant itself can grow and reach about 1m to 1.5m which is something rare to see. The flowers bloom in groups.
What is nice about this plant and what caught my attention as I was doing my research is that this is a plant know in the past for its medical and nutritious components and to my surprise it's a member of the family of : MOLOKHIA!
So this year I didn't know if this one was an edible plant but we had beautiful pink flowers.


OK, get this name: Tropaeolum Majus or what is commonly know as Monk's crest...I wonder why? Are a native plant of the South American continent. Yes my land! These are also edible and can make a great salad as they have a pepper taste...The seeds also are edible and look like capers. This year we got orangy red flowers but you can also find them in yellow.


This is an outcast. We got envelopes with seeds and well after a few months we saw this appear. We have no idea what this might be and it's quite curious. I like it because it's like a daisy in yellow and black and has polka dots in the same colors in the center. How elegant! We thought it was something like an African Daisy but the petals are much smaller. We only know that they are related. :P


We planted some bulbs we had from the previous year and bought some new ones in February. We decided to plan these once the snow had melted by end March and put all the bulbs together with some distance from each other. They were white, yellow, pink and red. So in the end we had by the month of June these nice flowers. They are lime yellow with red dots. We also had very nice fuchsia pink and white flowers as well and they lasted much longer that the ones you buy at the florist. We were lucky to have them for 2 to 3 weeks.


I went to the kitchen and I had some poppy seeds which I used for one of the recipes in this blog. Well, I think I've had these seeds for more than a year and I was just experimenting. I was surprised one day to see this green little thing growing and growing...until we saw it bloom!
They looked so delicate...we ended up having more seeds after they died and we replanted them on the same pot. I think we will have more in the coming months!


This is a plant that didn't die in winter and we have these for 3 summers now. They are called Pelargonias domesticus, easy to take care of and do not require mayor attention. You have to water them of course but besides this...you can leave them to grow and live on their own.


These are cornflowers. This was once a wild flower growing in crop fields, hence the name. It became extinct and now it is making its way back as an ornamental plant. Have you ever tasted the tea called Lady Grey from Twining? Well it has cornflower petals! It is also a good source of the color blue in paints. This year we had pink, purple, blue and white flowers, and I have to say they are still blooming since the end of May. Guess I will add some to my tea.


Marigolds! In Chile, we called them "Chinas". Although this is a plant originally from the Mediterranean region and what was once known as Mesopotamia. They are a remedy plant, having anti-viral and anti-inflammatory purposes. We had a whole bunch growing this year and they keep on blooming like the cornflowers. I had eaten some of the petals and they are not that bad. They are nice for salad and would surely decorate a dish in a great way.


Can you guess what this is?

It's a Pumpkin's flower.

We have had them for dinner too. We stuffed them with cheese and some seasoning... Placed in the oven for 5 minutes in medium heat...and voila! Tasty, Tasty, Tasty! They are truly tasty. I strongly recommend if you ever find them at the supermarket or out in the fields. Also Zucchini flowers are also very tasty and a good alternative.
Apparently there is a Male and a Female flower...I couldn't tell.


A Classic. Daisies. Don't they make you happy just by looking at them?

On this note I leave you.

I dedicate this post to my beloved Dog. I hope you are resting in peace with the Lady bug.
Love you Magoo.

Sunday, July 18, 2010

Origami Party - Butterflies in an open cage


I decided to make a nice and short origami tutorial for a simple butterfly.


You can make them in different colors and different sizes

All it takes is a square of paper. Take one in a nice color to work with.
Fold it diagonally on either side and fold on its center once. You can see the folding lines here.

Then, make the square become two distinct triangles, the folds you have made will help you.

This is how it looks from below.

And from above.

Take one triangular side and work on it.

Start by folding one tip of the bottom base up to the summit of the triangle.

Like this, and repeat this step on the other tip of the base.

You'll have something looking like this.

Then turn the piece around and fold, leave a tiny tip on the top.

Like this, and fold the top down.

It should look like this, and make sure you secure this part as you will work on it later. Try to make the top part small as it will be easier to make tougher folds later.

Turn the piece around, and work on the 2 triangles we made previously.

Take one part, the top and open by sliding it down, you will need to put your finger inside the center, of the opening, like this to open one of the butterfly's wings, it will instantly create a new triangle, a tiny one on that area. Make sure your wings are straight and go down together in the same way.

This is the new triangle I was telling you about. Now, make the same step on the other side, the other wing of the butterfly. And turn the piece around.

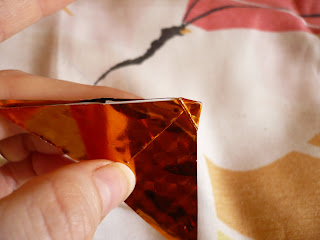
You are almost done, now that you have the shape of the butterfly, you just need to make 3 more folds and these are the tough ones!

First tough fold, start by folding the butterfly in half, and press really hard!


Like this, see the top of the butterfly's head there?

Then we will make a fold that will go from this central lower part of the butterfly to...

To one border of the head of the butterfly.

Fold the wing up and press really really hard as this is a very thick one!
And repeat the same step on the other side of the wings.

Your 3 folds should look like this, see the W shape ?

You can see it better here on how you should fold...

And Voila! Here is your butterfly ready to fly off!

Remember always to keep cages wide open and let all creature fly free.


Thursday, July 1, 2010

Floral Composition 2, October 2008


This is the second composition I did that fall and I remember I was experimenting with colors and things in general. I had taken some of the bibelots that are around the house as decor like this Chinese guard dog (or lion). They are commonly called Fu Lions (0r Dogs), that in Chinese belief these have protective powers. I only had one in this piece as my center, as this one represents a male playing with a ball, that is actually the "flower of life". The female is believed to represent the cycle of life, having her paw on a cub, as she either protects it or kills it. That's why I didn't have her on this picture. I think this is a macho perspective...why is Male the symbol of life and not female which is the symbol of death? I have to dig deeper into this...to understand the Chinese Han-Dynasty mentality.
I also placed a hand of protection from the evil eye and a set of butterflies made out of horse hair done by a town in Southern Chile called Rari. They make anything out of horse hair (crin) and these are nice brooches that I collected over the years. My mom was a fan of these things when she was a young and beautiful hippie in the 70s.
So the funny thing is that one of my neighbors had just thrown to the garbage a nice flourishing plant with its recipient. It was a lovely Begonia "Gobe" (you see it on your left just below the butterflies). This plant grows indoors, and has several reproduction methods such as by roots or by leaf cutting, this latter I have tried and it works better than the roots. So for the leaf cutting reproduction, you just take a leaf from the main stem area of the plant, it has to be a fully grown one, and you place it on a glass of water. Roots will start growing under the stem of this leaf, once it has a lot of roots and that the leaf has developed new auxiliary buds, it is time to replant. I've managed to have 3 of these at home now, and they are growing rapidly... I like them because they resemble lotus leaves...
This picture was taken in late fall and I think by the time we had our first snow that year. I was basically collecting the remains of foliage and fruits from the park next door and I managed to collect the following:

-A nice Burgundy branch with leaves that I don't know the name and the tree was cut the following spring.
-Wild red apples, you can see their size is relatively small...very tiny.
-Extremely tiny quince
and
- A branch of snowberries (Symphoricarpos)

The only edible fruits here are the apples and the quinces, the snowberries are mainly decorative plants for winter gardens and they stay mostly of the year with its fruits, and can bare very cold climates. once you open one of the fruits you will see sparkling granular snow...
In previous years I would pick some of the apples and quinces in the park and make marmalade. They taste much more sour than the actual apples and quinces but this makes it all the more interesting. My grandmother taught me how to make marmalade and jelly out of a quince . The process is quite simple, you can just makes marmalade out of the flesh of the fruit with sugar, normally it's 1 kilogram of fruit and 1 kilogram of sugar and bring to boil for a couple of hours. I use much less sugar and brown if I have some. the Jelly part is actually done with the remains, the skin and the seeds and central part of the quince. You bring to boil with less sugar than the marmalade and you will have a nice thick jelly. Basically you lose nothing. I haven't tried the process in other fruits but mainly this is done with quinces as they have a special gum in the seed and skin parts.
To top the whole, I decided to add two beautiful pink flowers, one a fully bloomed lily and a nice chrysanthemum.